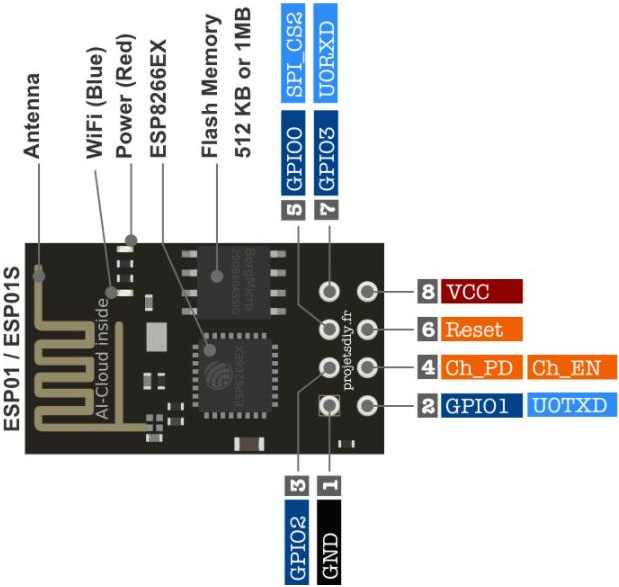
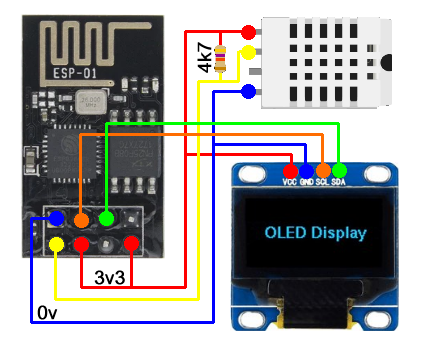
Exemple d'un afficheur I2C et d'un thermomètre
Câblage pour l'utilisation
Installation dans Home Assistant
(Celle que j’ai faite le 03/11/2024)
- Tout d’abord, copier la police « BebasNeue-Regular.ttf » dans le répertoire « CONFIG/esphome/ ».
- Ouvrir l’onglet ESPHome dans Home Assistant.
- Dans le cadre de l’entité choisie, cliquer sur « EDIT« .
- Ajouter le programme suivant à la fin du « de base » (après « captive_portal:« ).
- Cliquer sur « SAVE », puis sur « INSTALL ».
- Dans la fenêtre qui s’ouvre, choisir « Wirelessly ».
- Si tout va bien, cela doit fonctionner !!!
Le programme final après ajout de la partie spécifique
esphome:
name: esp-01-dht22
friendly_name: Esp-01_Dht22
esp8266:
board: esp01_1m
# Enable logging
logger:
# Enable Home Assistant API
api:
encryption:
key: « +MgWcN6CCTxWjF/S+ZqnvhBvI1YXmJEQozwxhrWjRTU= »
ota:
– platform: esphome
password: « 5e79aae36c960d26308f6f4f12408e6a »
wifi:
ssid: !secret wifi_ssid
password: !secret wifi_password
# Enable fallback hotspot (captive portal) in case wifi connection fails
ap:
ssid: « Esp-01-Dht22 Fallback Hotspot »
password: « cjj2niQBVtiG »
captive_portal:
i2c:
sda: GPIO0
scl: GPIO2
font:
– file: « BebasNeue-Regular.ttf »
id: BebasNeue_20
size: 20
– file: « BebasNeue-Regular.ttf »
id: BebasNeue_25
size: 25
– file: « BebasNeue-Regular.ttf »
id: BebasNeue_30
size: 30
– file: « BebasNeue-Regular.ttf »
id: BebasNeue_45
size: 45
– file: « gfonts://Roboto »
id: roboto_15
size: 15
extras:
– file: « gfonts://Roboto »
glyphs: [à,é,è,ç,ô,î,ö,ï,ù,µ,]
– file: « gfonts://Roboto »
id: roboto_20
size: 20
– file: « gfonts://Roboto »
id: roboto_25
size: 25
– file: « gfonts://Roboto »
id: roboto_30
size: 30
sensor:
– platform: dht
pin: GPIO1
temperature:
id: « temp »
name: « T° Buffet »
humidity:
id: « Humid »
name: « H% Buffet »
update_interval: 30s
– platform: wifi_signal
name: Signal WiFi
update_interval: 300s
filters:
– delta: 10%
– platform: homeassistant
id: Dht
entity_id: sensor.esp_mini_d1_t_buffet_mini_d1
– platform: homeassistant
id: _5A_T_Salon
entity_id: sensor.ha_5a_t_salon_temperature
– platform: homeassistant
id: _5A_T_Palier
entity_id: sensor.ha_5a_t_palier_temperature
– platform: homeassistant
id: Elevation
entity_id: sun.sun
attribute: elevation
– platform: homeassistant
id: Azimuth
entity_id: sun.sun
attribute: azimuth
time:
– platform: homeassistant
id: esptime
text_sensor:
# Expose WiFi information as sensors
– platform: wifi_info
ip_address:
name: Adresse IP
mac_address:
name: Adresse MAC
display:
– platform: ssd1306_i2c
model: « SSD1306 128×64 »
#rotation: 270°
address: 0x3C
contrast: 10%
id: my_display
pages:
– id: page1
lambda: |-
it.print(63, 7, id(roboto_15), TextAlign::CENTER, « – Horo -« );
it.strftime(63, 31, id(BebasNeue_20), TextAlign::CENTER, « %d/%m », id(esptime).now());
it.strftime(63, 55, id(BebasNeue_30), TextAlign::CENTER, « %H:%M », id(esptime).now());
– id: page2
lambda: |-
it.print(63, 7, id(roboto_15), TextAlign::CENTER, « – Soleil -« );
it.printf(63, 31, id(BebasNeue_25), TextAlign::CENTER, « %.0f° », id(Elevation).state);
it.printf(63, 55, id(BebasNeue_25), TextAlign::CENTER, « %.0f° », id(Azimuth).state);
– id: page3
lambda: |-
it.print(63, 7, id(roboto_15), TextAlign::CENTER, « – VdR -« );
it.print(0, 25, id(roboto_15), « Buffet »);
it.print(0, 49, id(roboto_15), « Véranda »);
it.printf(it.get_width(), 17, id(BebasNeue_25), TextAlign::TOP_RIGHT, « %.1f° », id(temp).state);
it.printf(it.get_width(), 41, id(BebasNeue_25), TextAlign::TOP_RIGHT, « %.1f° », id(Dht).state);
– id: page4
lambda: |-
it.print(63, 7, id(roboto_15), TextAlign::CENTER, « – 5A -« );
it.print(0, 25, id(roboto_15), « Buffet »);
it.print(0, 49, id(roboto_15), « Palier »);
it.printf(it.get_width(), 17, id(BebasNeue_25), TextAlign::TOP_RIGHT, « %.1f° », id(_5A_T_Salon).state);
it.printf(it.get_width(), 41, id(BebasNeue_25), TextAlign::TOP_RIGHT, « %.1f° », id(_5A_T_Palier).state);
# For example cycle through pages on a timer
interval:
– interval: 3s
then:
– display.page.show_next: my_display
– component.update: my_display